Showing posts with label Stuff I Make. Show all posts

Wednesday, August 1, 2012

Inexpensive Hand-Tied Wedding Bouquet {DIY}


A friend of mine was recently married, but being the talented makeup artist that she is, she did everyone's makeup and ran out of time for her photographer to take bridal portraits. So I recommended my husband take post-wedding pictures of the two of them. This turned out to be such a fun solution to a very common problem. So many weddings are rushed and there is often little time to shoot those crazy romantic and fun portraits of the special couple.
The night of our shoot she did her makeup,  had her hair done up all over again, he rented a tux, and I made up this sweet little bouquet for her to carry. Everyone knows Trader Joe's has fabulous, inexpensive flowers, so I just picked up $10 purple flowers with red roses and whipped up a simple hand-tied bouquet. If you've never made one, give it a try. They are so beautiful and easy to make.

How To Make A Hand-Tied Bride Or Bridesmaid Bouquet

1.  Start by gathering up the flowers in your hand one stem at a time. Be sure to alternate the different colors so all the flowers are evenly dispersed throughout. Since roses were the fanciest flower in this bouquet, I made sure they didn't get lost among the others. As you gather all the flowers together try to create a dome shape. Use stronger stems around the outside perimeter to give strength to the overall design.

2. Take a skinny rubber band, wrap it around the middle of the flower stems and tie it in a knot. If you use a really thick rubber band you will end up with a lumpy "handle".

3. Trim all the stems to an even length.

4. Wrap green florist tape around the stems, covering up the rubber band and extending down the length of the stems a couple inches.

5. Use wide ribbon to cover up the florist tape. Tie a knot or bow and use hot glue to tack the ribbon in place wherever you see a weak spot which may slip. 

You can buy all kinds of gorgeous ornaments to cover the stems at craft stores. For our purposes, we kept it simple with purple ribbon.

Flowers are beautiful, but the bride and groom will always be the shinning stars in a wedding.

Saturday, December 10, 2011

Salt Dough Ornaments


I'm still learning how to manage my time at home. This new hair styling job takes up way more time than I'd like and my housework will often fall to the way side. Sometimes I simply choose to play with my kids over keeping a clean kitchen. Here's one of those days!
I found this super easy recipe for salt dough and as soon as I realized we had all the ingredients, it instantly rose to the top of my to-do list.


The recipe I used was:

1 cup salt
2 cups flour
1 cup water


I kneaded it for about 7 min. then we rolled it out, used cookie cutters, and I poked a hole in the top with a straw. Easy peasy.


We had to bake them for around 2 hours at 250. When they cooled we used acrylic paint, white glue and glitter to decorate. I did all the writing with a black Sharpie. It worked like a charm and was much easier than a brush.


After they were completely dry, I sprayed them with a high gloss spray. I love a little shine on kid projects. They somehow look a little more finished.


 The kids had a blast! (And I obviously enjoyed our project as well!)


Friday, July 29, 2011

Frayed Rosette Headband Tutorial

Here's my Frayed Rosette Headband Tutorial in case 
you missed it on Ucreate:

Make sure all your strips are cut on the bias (cut your fabric on an angle so the threads in the fabric are running on the diagonal). This way you don't have threads shedding off your headband.


Cut one strip of fabric 2" X 9"
Cut two strips of fabric 1-1/2"  X 9"
Cut two more strips as long as you can make them 1" wide to wrap your headband with.


Step One: Take the widest strip and fold in half lengthwise about 3/4 of the way as in the picture.


Step Two: Sew along the long folded edge and pull the stitching to gather it.


Step Three: Sew the short ends together so you have a ring.


Step Four: Squash the circle a little to make an oval and sew the middle together on the backside so it stays an oval shape.


Step Five: Repeat steps 1-4 on the 1-1/2 " strips.

Now you should have three ovals that look like this.

Step Six: Fray the edges of the ovals by pulling on the fabric with your fingers.


Step Seven: Fray one side of your long 1" strips. Then simply wrap your headband in the strips of fabric pulling the fabric a little so it forms to the arch of the band. Wrap the fabric at a slight angle and overlap just a little as you go. I put a dab of hot glue on the underside of the headband with each wrap of fabric.  If you need two strips to completely cover the headband, place your "seam" on the top where you'll be gluing your rosettes.


Step Eight: Hot glue the ovals onto your headband and if you'd like add a button, rhinestones, or a vintage earring like I did.

Friday, July 8, 2011

My First Batch of Homemade Laundry Soap

I was simply THRILLED when I found this recipe for laundry soap by  
diyNatural.
One thing I love about this recipe is that it's powdered. I could make small batches at a time 
and not store multiple gallon of the stuff in my house.
diyNatural has tons of recipes for beauty products, cleaners, food etc. 
This is the first idea of theirs I've tried. 
I don't want to be accused of stealing their recipe so please visit their site for all the details! 


You just use these simple ingredients which my husband picked up at Walmart.


(My little helper is sooooo serious!)


Ivory Soap


Washing Soda


Borax


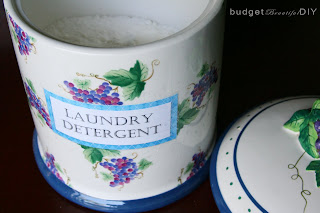
This is very easy to make and really cheap. I'm excited I can put it in my cute little canister too! :)


Sunday, June 26, 2011

My New Quilt


Last year I decided to start making a rag quilt for my bed. Of course, it took ALL YEAR! You'd think I was working on some amazing tiny pieces and hand binding it. Nope. I used LARGE pieces and it's a RAG quilt! Oh well, that's what happens when you have two little kids right? It would be much easier to buy a cheap comforter but our bed is HUGE. Ordinary king size bedding doesn't fit for some reason and I bought a few unsuccessful duvets over the years that literally came up short. I really had no option but to bring out the sewing machine.


Here are all my cheats while making my quilt:

1.I used a lot of white fabric because solids are cheaper than prints.
2.I staggered all my pieces so I didn't have to match corners.
3. I used large pieces so I didn't have to sew forever.
4. I made a rag quilt because I didn't want to actually "quilt" anything or do any hand binding. I also figured there is less mass in a rag quilt so I could wash it in my washer without any problem.

The next project will be making new pillow shams and curtains. Oh, and painting my bedroom. I'll be sure to post pictures of my entire room when the makeover is complete.

Saturday, June 25, 2011

My First Tutorial On Ucreate!

Oh wow! I am soooooo excited, and surprised to be a creative guest on Ucreate.
(This is my very first time to be a guest on anyone's blog.)
Kari is super sweet and always shares amazing projects. I was really flattered when she told me she liked my Frayed Rosette Headband and now my tutorial is up this weekend!
You should totally check it out! I had so much fun with this one, I seriously hope to do more in the future.

Monday, June 20, 2011

Dollhouse Remodel

All these years my parents kept the dollhouse I had when I was a kid. One day my daughter discovered it and from that point on said she wanted a pink dollhouse for her birthday. So we painted it inside and out. I bought cheap furniture kits on eBay and even made some from popsicle sticks. I wallpapered with scrapbook paper I already had and put bedding on the beds with scrap fabric. The cost of this house remodel was only about $25 not included the new dolls her grandparents purchased. She loves it, I love it, and new memories are being made the second time around!

Sunday, June 5, 2011

Joann's Clearance Beads

Joann's had a crazy amount of beads on clearance the other day. YIPEE
Most of the strands were 97cents each. AMAZING!
I had a gift card from my birthday. YAY!

So here's what I bought-
Three strands of light aqua beads at 97 cents each and one strand of silver discs for $1.97
Here's what I made.

I've been avoiding necklaces because for the longest time my baby boy has been pulling on all my jewelry. He's finally out growing it. Time to celebrate this much appreciated milestone with a new piece of jewelry!