Showing posts with label Party Ideas. Show all posts

Wednesday, November 7, 2012

Rapunzel Pinata Tutorial (Ribbon Pull)


Last year we discovered the ribbon pull pinatas. (I don't know the official name for these, but that's what I call them.) The first one we used I bought at Target on sale. We simply don't have a place to hang a traditional pinata and I think our kids are too small to be swinging around a bat in a circle of people.
The way you play is each kid takes turns pulling a ribbon. All but one will pop off easily. Whoever pulls the ribbon attached to the trap door will open up the pinata and let all the candy out. Simple, easy, and SAFE!
Here's how I made our Rapunzel Ribbon Pull Pinata (inspired by a traditional pinata on this blog ).


Friday, January 20, 2012

Inexpesive Pirate / Neverland Party

My original thought was to have a pirate party for my little guy; however, I ended up officially calling it a Neverland party. I love to encourage guests to dress up and I thought mermaids, pirates, fairies, lost boys, etc. would be fun costume ideas. The birthday boy himself wore a costume which loosely resembles that of Jake and the Neverland Pirates. I made the vest out of felt (which I bought for around $2) and I used the trim and buttons I found in my sewing supplies. His shirt was a 25 cent yard sale find, and everything else we already had on hand.

The hanging pirate decorations I bought at a yard sale for a quarter as well. It was a brand new three pack and they were so long, I cut them up into shorter pieces.
The banner was made from paper we had in the kids craft stash and all the other table decor was from around the house.
The plates, napkins and cups I found on clearance for 75 cents each at  Target last summer.
I made the cake myself and the favors were just treat bags with Pirate Booty and extra gold coins.
Everything turned out pretty cute and wasn't too elaborate or complicated. It was perfect for my little pirate!


Wednesday, October 19, 2011

Creative Gift Wrap

   I always feel silly when I try to wrap gifts for guys. Deep down, I want to throw something frilly together; but I end up making it simple and boring. In the end I guess they never care; however, this time around I actually came up with a decent idea. 
  We happened to have black wrapping paper in the closet. I think I picked it up at the dollar store, or someplace like that. It reminded me of a chalk board so I wrote on it with chalk. 
Instead of a ribbon, cheap twine looked pretty cute. Then I hot glued some silk leaves on it in place of a bow.
   I think this would be really cute for a teachers gift too or or even your child's first day of school.

This worked out so well, black paper might become a gift wrapping staple for us.

Saturday, October 15, 2011

How to Smooth Out Frosting {Princess Barbie Cake}


For the cake itself I baked an entire cake mix in a 9" Pyrex bowl. It took close to an hour to bake. Then I made 3- 9" round cakes. All together it took about 2 1/2 cake mixes. Cut circles in the middle of all the cakes, stack layers with frosting in between, wrap Barbie in plastic wrap then drop her down into the center. Pretty easy and much cheaper than those princess cake pans you buy at a craft store

Smooth Frosting

Start by making your own butter cream frosting. Here's the recipe I used:
In a mixer combine - 
1 cup butter
1 pound powdered sugar (add just a little at a time)
1 teaspoon vanilla
a couple teaspoons water (or milk) until you  reach the desired consistency

I needed about 4X the recipe for this cake.


 Smooth frosting out the best you can. I used upward strokes with a spatula.
Now refrigerate until it's crusted over. About 10-15 minutes.


Place a paper towel onto the frosting and smooth your hands over it. You can feel the lumps and gently apply just a little extra pressure to those areas. Gently peel off the paper towel. It shouldn't stick too much. If it does, you either pressed too hard or didn't refrigerate it enough.


Refrigerate it again then apply your piped designs.


A perfect princess cake for your princess!

Thursday, October 6, 2011

A Party For My Princess


I know it's been a while since I last posted. Our days are finally starting to settle into a routine leaving me a little more time to do things for myself and work on creative projects.
Even though our little world has been turned upside down,
I still threw a Barbie Princess birthday bash for my sweet girl.

I decked out a simple pink tiara with goodies from my craft stash.
Barbie Princess Dress we found at a yard sale. Lucky us!


{Barbie Princess Party Details List}

Decor we had on hand:
Pink curtains (hand-me-downs)
Pink tablecloth overlay (from her grandma's fabric stash)
Birthday banner (from her 1st birthday)
Pom poms (from her bedroom)
Pink pails (left over from a bridal shower)
Yard sale fan (one of her toys)

Party items we found on clearance:
Pink plates 
Princess napkins
Pinata

$1 party deals:
Tiara party favors for girls
Sword party favors for boys
Yard sale dress for the birthday girl

Menu
Heart shaped PB&J sandwiches
Watermelon
Strawberries
Juice with club soda
and of course a Barbie cake I made!
(I'll give details on the cake next week. So stay tuned...)

Wednesday, May 25, 2011

Tissue Paper Pom Pom Tutorial


The first time I ever made these tissue paper pom poms was for my daughters first birthday. They have become my favorite decoration ever since. They are the perfect way to make a big impact for very little money. I usually use up to 14 sheets of tissue paper but I only used 5 for this tutorial. To be honest I was surprised they even turned out okay.

 Step One: Lay tissue paper flat onto the table making sure all the edges line up

Step Two: Accordion  fold all the sheets together making each fold 1 inch wide.

Step Three: Tie ribbon around the middle of the folded tissue paper leaving a long tail so you can hang it
Step Four: Cut the ends into a point.

Step Five: Open up all the layers and fluff it into a nice round shape.

Wednesday, May 18, 2011

DIY Mermaid Costume and Party

 When my daughter turned three she asked for a mermaid birthday party. I had no clue how to make a mermaid costume, so I browsed You Tube videos to find some kind of directions  to lead me. We ended up finding tutorials for those mermaid tails women can actually swim in. That is what gave me the idea for this mermaid dress.

I used sparkly blue fabric made for swim and dance wear. Taking advantage of Sunday coupons,  it only cost me $5. I think I bought 1 1/2 yards.
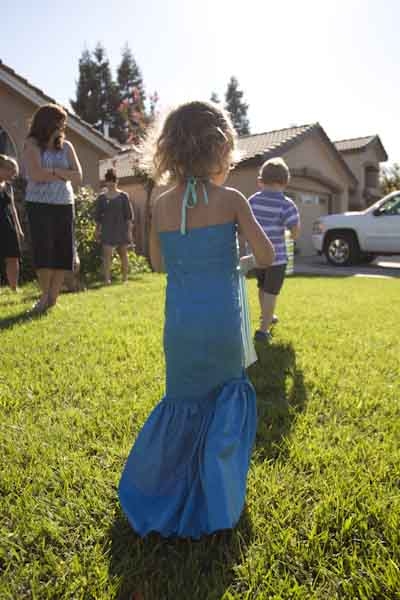
The top and bottom are really just two tubes with center seams. The top has a seam in the front along with a casing that runs along either side of the seam. I ran ribbon through the casing so I could bunch up the front a little then tie it around her neck.


The skirt has the center seam down the back. I did nip it in the waist a bit so it fit her body better and wouldn't fall off. Then I made a deep ruffle and just sewed it on the bottom allowing it to drag in the back forming a small train. I arranged the two ends of the ruffle to meet at the bottom corners so it looks a little more fishy. The bottom of the "tube" fabric was cut away beneath the ruffle so it was easier to walk in. This is kind of hard to explain and I hope my pictures show what I'm talking about!

I made a matching dress for her doll but the tail looks like an actual tail and I placed a piece of  plastic milk carton in it to hold the shape.

None of the edges are finished because this fabric doesn't unravel. Total time for her dress and the doll costume was only an hour and a half. I 'm sure it could be made in even less time but it took a while to figure out what would work.


Her headband was virtually free since I only used items I had on hand.
We just hot glued shells and rhinestones onto a blue headband.

Here are the other details of her party:
-Shell necklaces for party favors
-We painted wooden boxes (treasure chests) as our activity. The boxes were only 30 cents each.
- The kids went on a shell hunt (similar to an Easter egg hunt) on the front lawn. The shells I bought for super cheap at the dollar store.
Hunting for shells

- I made the cake using crushed graham crackers as sand, red fish candies and Playmobil mermaid toys as decorations.

This was easily my favorite kid party so far. It didn't cost much and was still loads of fun.

Wednesday, May 4, 2011

$2.67 Centerpiece and Banner of Love

'Tis the season for showers. Not just rain, but baby and bridal gift giving gatherings. The first on my list was a bridal shower for my dear friend Dannelle. Her wedding colors are pink and chocolate brown so all the decor fit in with that color scheme. I immediately made an adorable banner in these colors with papers I already had. To be completely honest, they were papers that had been collecting dust because I wasn't too thrilled with them for scrapbooking. I was rather amazed with what a great banner they made though. I experimented with pleating paper and I'm really happy with the texture it added. Of course a bit of glitter and rhinestones add that dash of girly glitz as well. I chose the word "AMORE" so Dannelle can use it as decor for her home or maybe even a baby girls nursery some day!

Total cost for banner: FREE


I'm lucky to be part of a large bridal party. There were seven of us throwing the shower. This means everyone was willing to pitch in on the costs for the shower. One of my responsibilities was to make centerpieces. Target had some adorable pink pails for only a buck. With some other pink paper, I made little paper birds that I glued onto wooden skewers and then tied on strips of tulle. Annuals are a pretty good price now so I spent $4 on 2 six packs of plants. I then cheated and put geranium cuttings from my front yard in the pails as well.
Then I found some really pretty fabric on sale. I spent $9 on a yard and a half. The fabric I made into squares to place under the pails and I made a really long runner for the food counter.  In reality I made 6 napkins and a runner which we gave to the bride to use in her home. Pretty cool huh?

Total cost per centerpiece: $2.67

Table runner: $3 (I don't have a picture of the runner. Sorry!)