

Monday, July 4, 2011
Friday, July 1, 2011
$36 Laundry Room Makeover
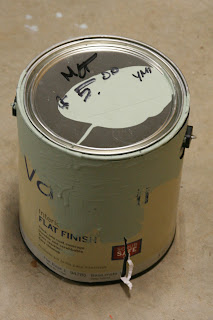
I have always loved the idea of a pretty laundry room but have never justified spending the money to do anything with mine. That is until I had the idea of doing it on the cheap. And I mean CHEAP. Those mis-tint cans of paint at home stores have always beckoned to me but I've never actually bought any. That is until now! I crossed my fingers and found a wonderful grayish green for only $5. You obviously can't be picky and I wasn't. I just wanted a neutral.
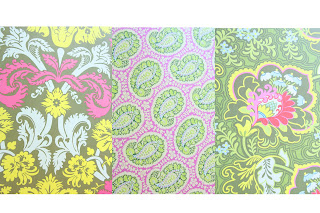
Once I found my paint I looked through my scrapbook papers for color inspiration and found these designed by Amy Butler. So my pink and blue accents were drawn from these
 .
.
A couple weekends ago, I found a fun set of ceramic canisters at a yard sale for $3 which hold my laundry bags, gloves, and laundry soap (labeled to avoid confusing it with any food item).

All the other storage items and a pink clipboard were from around the house either being underutilized or not used at all.

The wall art was made by me for free. I reused an old canvas of mine and the other supplies were already on hand.

I wanted to do wall hooks so I had the guy at Lowe's cut some decorative trim to fit pre-cut planks ($2.91 each). The hooks were on sale for $2.39 (originally $5.97 each) as was the trim (sale price $4.79). So these little hook projects only cost $28 for both racks. I probably could have found hooks at the dollar store, but I thought these were super pretty. They are the jewelry of my room.

My daughter and I painted and decorated an empty diaper box to hold party supplies. I borrowed this idea from another blog, but for the life of me I can't remember where I saw it.

So here are the before pictures. For your amusement, I left it in all it's messy glory!
 ...and after!


The grand total for my fun little makeover was only $36! I no longer need to be embarrassed to have people see it, assuming I keep it this way!

Once I found my paint I looked through my scrapbook papers for color inspiration and found these designed by Amy Butler. So my pink and blue accents were drawn from these

A couple weekends ago, I found a fun set of ceramic canisters at a yard sale for $3 which hold my laundry bags, gloves, and laundry soap (labeled to avoid confusing it with any food item).

All the other storage items and a pink clipboard were from around the house either being underutilized or not used at all.

The wall art was made by me for free. I reused an old canvas of mine and the other supplies were already on hand.

I wanted to do wall hooks so I had the guy at Lowe's cut some decorative trim to fit pre-cut planks ($2.91 each). The hooks were on sale for $2.39 (originally $5.97 each) as was the trim (sale price $4.79). So these little hook projects only cost $28 for both racks. I probably could have found hooks at the dollar store, but I thought these were super pretty. They are the jewelry of my room.

My daughter and I painted and decorated an empty diaper box to hold party supplies. I borrowed this idea from another blog, but for the life of me I can't remember where I saw it.

So here are the before pictures. For your amusement, I left it in all it's messy glory!


The grand total for my fun little makeover was only $36! I no longer need to be embarrassed to have people see it, assuming I keep it this way!
Wednesday, June 29, 2011
Paper Dress Art

I've been so inspired by all the adorable laundry room makeovers I've seen that I wanted to make my own laundry room a little prettier. So I came up with this quick art project to get started.
First of all I took white, gray and turquoise acrylic paint and did broad streaks across it to resemble a sky.


Then I used a few of my favorite scrapbook papers by Amy Butler to cut out dresses and some simple letters.


Now I'm one step closer to a cute laundry room!
Monday, June 27, 2011
Portraits

I came to a sad discovery the other day when Ucreate needed a picture of me to put with my tutorial Apparently I didn't have any nice pictures of myself despite the fact that my husband is a PHOTOGRAPHER!
Good grief! You know how it is. You are always the one posing people or getting the kids attention so you get left out and there are a million pictures of everyone else.
So last night we had a little photo shoot after the kids went to bed. He then gave me a lesson in using Photoshop. I think they turned out great! Thanks honey! If you'd like to see his portfolio check him out at


Sunday, June 26, 2011
My New Quilt


Last year I decided to start making a rag quilt for my bed. Of course, it took ALL YEAR! You'd think I was working on some amazing tiny pieces and hand binding it. Nope. I used LARGE pieces and it's a RAG quilt! Oh well, that's what happens when you have two little kids right? It would be much easier to buy a cheap comforter but our bed is HUGE. Ordinary king size bedding doesn't fit for some reason and I bought a few unsuccessful duvets over the years that literally came up short. I really had no option but to bring out the sewing machine.

Here are all my cheats while making my quilt:
1.I used a lot of white fabric because solids are cheaper than prints.
2.I staggered all my pieces so I didn't have to match corners.
3. I used large pieces so I didn't have to sew forever.
4. I made a rag quilt because I didn't want to actually "quilt" anything or do any hand binding. I also figured there is less mass in a rag quilt so I could wash it in my washer without any problem.
 | |
| The next project will be making new pillow shams and curtains. Oh, and painting my bedroom. I'll be sure to post pictures of my entire room when the makeover is complete. |
Saturday, June 25, 2011
My First Tutorial On Ucreate!
Oh wow! I am soooooo excited, and surprised to be a creative guest on Ucreate.
(This is my very first time to be a guest on anyone's blog.)
Kari is super sweet and always shares amazing projects. I was really flattered when she told me she liked my Frayed Rosette Headband and now my tutorial is up this weekend!
You should totally check it out! I had so much fun with this one, I seriously hope to do more in the future.

Thursday, June 23, 2011
Chocolate Cake Cookie

Easy to make with kids.
Easy to eat.
Easy to remember next time you have a craving!


Subscribe to:
Posts (Atom)