Tuesday, May 27, 2014

Alice In Wonderland First Birthday Party - Part Four

I'm not known for my cooking abilities. To be honest, I really don't have time. So for food my parents picked up fried and baked chicken. That was my attempt to make all the protein lovers happy. My lovely sis-in-law made rice pilaf. Both hot items were placed in two of the prettiest rental chafing dishes I've ever seen.


. The rest was garlic bread, crackers, sandwiches, fruit, lemonade and pastries from the grocery store.  I like to pretend I'm a baker so I made my baby girl a dark chocolate cake (from a box). It's frosted with (homemade)  vanilla butter cream and decorated  with fresh fruit. My simple cake looks so impressive on the fancy cake stand! I'm sure it's really meant for weddings, but I think it looks amazing at this party!


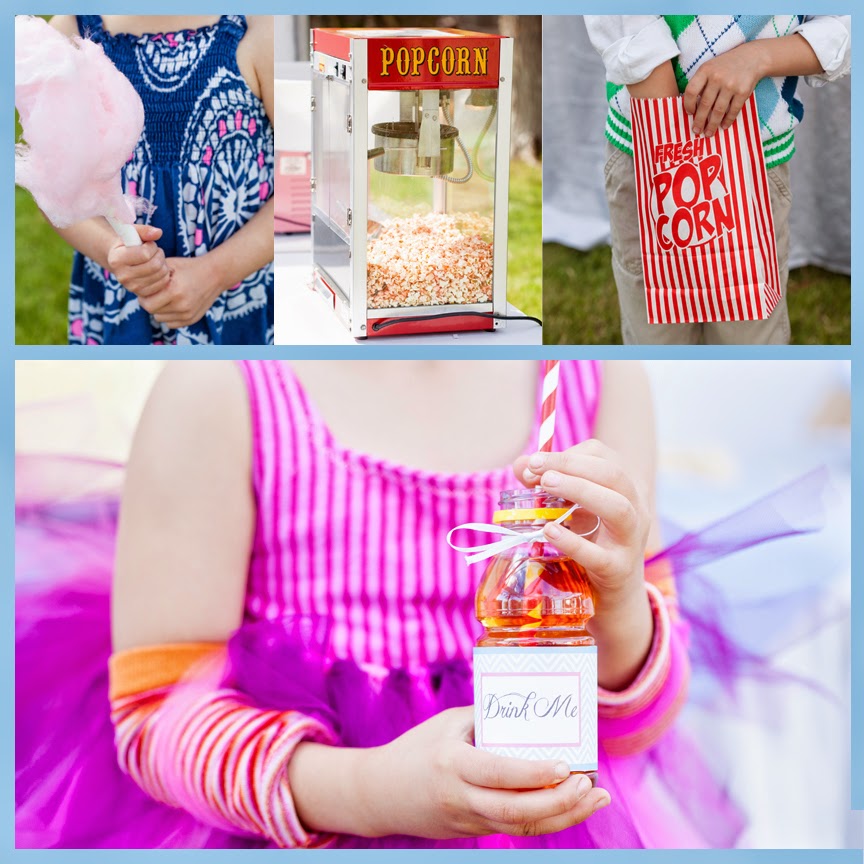
We also rented a popcorn and cotton candy machine. The kids were in heaven with the cotton candy! For most of the littles in our circle this is a total luxury. As soon as they stepped foot into the backyard these munchkins were greeted with fluffy sugar and colorful popcorn.
Needless to say, they had a blast. It was the ultimate party for our little family. I'm sad this is the last baby we have added to our brood, but what a glorious way to celebrate that last first birthday!


Many thanks to Expo Party Rentals and their superb customer service. Sarah went above and beyond in helping us make this a special day for our sweet baby girl. The set up crew was courteous and professional. The rental products were simply gorgeous as well.
Thank you also to the family and friends who pitched in with cleaning, cooking, prepping, decorating, and attending the party.
 We love you all and are so blessed to have you in our lives!

Wednesday, May 14, 2014

Alice in Wonderland First Birthday Part Three


     I love pretty linens and china. I've been lucky enough to inherit some of my grandmothers tea cup collection and I pick up bits and pieces at yard sales when I get the chance. However, I don't have enough of everything for a large party like this one. Besides, we had a large range in ages attend our Wonderland party.
      Therefore, the kid tables and the adult tables were slightly different. I wanted a Mad Hatter tea party going on with the adults using my vintage tea cups. It didn't seem wise to have the munchkins around some of my grandma's tea cup collection, so they ended up with Drink Me labels on apple juice bottles. I'm sure they would rather have apple juice than tea anyway. Everyone had the double gold band salad plates and Parisian flatware. I think my tea cup collection looks perfect with the rental china. The touch of gold really ties everything together.
     Both tables had a baby blue cloths with a white runner. How cute are the covers and bows on the kid chairs? They almost look like little dresses! So sweet!
     (All the salad plates, flatware, linens, tables and chairs pictured are from Expo Party Rentals )


Friday, May 9, 2014

Alice In Wonderland First Birthday Party Part Two - Crafts

     Kid parties are the perfect time to go crazy with craft projects. Since we have a photography business, we have a large collection of baby portraits to display. I picked up these hinged picture frames from the dollar store and enlisted my older kids to help paint and glitter them. I wanted the back side of the frames to be cute as well so I covered the backs with scrapbook paper and amusing Alice In Wonderland quotes. The first time I read the book I was about 9 years old. Reading it as an adult was a whole new experience. Strangely enough, I can relate to most of the quotes. Yes, at times I feel as though I have fallen down a rabbit hole and we are all mad here!


     Our favors were small bags with round chocolate mint patties inside. My goodness I love those candies! We placed little clocks on them with the time of our daughters birth. Credit to that little detail must go to my oldest daughter. She's one smart cookie! To finish them off, I printed up little labels to staple to the top of the bags. They turned out cute and sweet  and I was more than happy to take home the left overs.

( Rental items are all from Expo Party Rentals.)

Monday, May 5, 2014

First Bithday Party Wonderland Style Part 1


     If we are truly honest with ourselves, a baby's first birthday party is really for the parents. And if we are really, really honest, it is for the mom. I don't have a problem with that. Why not allow mom to celebrate the hard labor and sleepless nights of the first year?
     Naturally, my daughter didn't have a preference on the theme of her first birthday. So I took full advantage of her apathy and designed an Alice in Wonderland party for us.
     Her birthday is in March and the weather can be pretty sketchy here in Fresno at this time so we rented a gorgeous clear top tent. I'm so glad I played it safe! The party day was sandwiched between days of showers! Since the tent was set up the morning before, the lawn was kept pretty dry preventing a muddy mess during the party.  I love that the clear top let all the light in and you could see fluffy white clouds in our sparkling blue sky.
     I scoured Pinterest for inexpensive decorating ideas. We all know tissue paper is crazy cheap at the dollar store, so tissue paper flowers was a no brainer. You can easily find tutorials on Pinterest for different kinds of flowers. I managed to get about 5 flowers in my color theme from each bundle of paper. They might be easy to make, but it is time consuming. One of the best parts is I pre-folded them then placed them in a bag until the day of the party. I didn't unfold the petals until just before the party. With the help of family we were able to fluff up the petals and hang them up in clusters of three inside the tent. How pretty are they against the sky?
      Another dollar store decorating idea was the playing card garland. It's really simple and stuck to our theme. But why have just one style garland when you can have two? Bless my hubby as he blew up tons of  balloons and strung them up as well. Balloons lend such a sweet, festive look and can really support the color theme you have chosen.
     Stay tuned... my next post will be about a couple craft projects I did for this party as well. In the meantime, here are some gorgeous HDR photographs my husband did of the tent along with detail shots we both took.
    I hope you are inspired!
 Many thanks to ExpoPartyRentals  They have beautiful products and outstanding customer service!


Photography by Ambient Art Photography
ambientartphoto.com


Wednesday, November 7, 2012

Removing Stains From American Girl Dolls

My husband bought an American Girl doll off of craigslist for our daughters 5th birthday. It was a GREAT deal!
The hair on this doll was perfect but  there were a few marks on the limbs. I used a magic eraser on most of the dirt and marks then I found this TUTORIAL.  I had the Proactive Repairing Treatment on hand so that is what I used on the one big stain still on the leg. I couldn't put her outside because the doll was a surprise so I just popped her in a cabinet in the laundry room. It took several days (most likely because there was no sunlight) but it worked perfectly otherwise. This doll is like new now. Couldn't be happier!

Rapunzel Pinata Tutorial (Ribbon Pull)


Last year we discovered the ribbon pull pinatas. (I don't know the official name for these, but that's what I call them.) The first one we used I bought at Target on sale. We simply don't have a place to hang a traditional pinata and I think our kids are too small to be swinging around a bat in a circle of people.
The way you play is each kid takes turns pulling a ribbon. All but one will pop off easily. Whoever pulls the ribbon attached to the trap door will open up the pinata and let all the candy out. Simple, easy, and SAFE!
Here's how I made our Rapunzel Ribbon Pull Pinata (inspired by a traditional pinata on this blog ).


Sunday, September 9, 2012

Pregnancy Announcement!!!!!!

When our eleven year anniversary rolled  around, my hubby had no idea what a surprise I had for him. I told him the kids and I were preparing a special breakfast and to stay in bed until we told him it was ready. He obviously had a bigger gift than breakfast awaiting him. I put up this little clothes line of onesies then the kids and I all held numbers. My daughter held a 1, my son a 2 and I had a 3 with an arrow pointing to my belly. Since I'm pretty sure this will be the last kid in the family, I wanted to put together a fun and creative pregnancy announcement for my man.
This little bun in the oven was a complete surprise to me as well. We weren't expecting to get pregnant with a third. I always wanted another baby though. It was a constant on my mind and God seemed to think now was as good a time as any to add to the family.
So here we go with another sweet baby coming next year. I can't wait to meet my little one!


This is the photo Brett took of us as our Facebook pregnancy announcement.

Wednesday, August 1, 2012

Inexpensive Hand-Tied Wedding Bouquet {DIY}


A friend of mine was recently married, but being the talented makeup artist that she is, she did everyone's makeup and ran out of time for her photographer to take bridal portraits. So I recommended my husband take post-wedding pictures of the two of them. This turned out to be such a fun solution to a very common problem. So many weddings are rushed and there is often little time to shoot those crazy romantic and fun portraits of the special couple.
The night of our shoot she did her makeup,  had her hair done up all over again, he rented a tux, and I made up this sweet little bouquet for her to carry. Everyone knows Trader Joe's has fabulous, inexpensive flowers, so I just picked up $10 purple flowers with red roses and whipped up a simple hand-tied bouquet. If you've never made one, give it a try. They are so beautiful and easy to make.

How To Make A Hand-Tied Bride Or Bridesmaid Bouquet

1.  Start by gathering up the flowers in your hand one stem at a time. Be sure to alternate the different colors so all the flowers are evenly dispersed throughout. Since roses were the fanciest flower in this bouquet, I made sure they didn't get lost among the others. As you gather all the flowers together try to create a dome shape. Use stronger stems around the outside perimeter to give strength to the overall design.

2. Take a skinny rubber band, wrap it around the middle of the flower stems and tie it in a knot. If you use a really thick rubber band you will end up with a lumpy "handle".

3. Trim all the stems to an even length.

4. Wrap green florist tape around the stems, covering up the rubber band and extending down the length of the stems a couple inches.

5. Use wide ribbon to cover up the florist tape. Tie a knot or bow and use hot glue to tack the ribbon in place wherever you see a weak spot which may slip. 

You can buy all kinds of gorgeous ornaments to cover the stems at craft stores. For our purposes, we kept it simple with purple ribbon.

Flowers are beautiful, but the bride and groom will always be the shinning stars in a wedding.

Sunday, April 29, 2012

Creative Family Portraits

     Like any other art form, photographers develop their own styles. Some have the soft vintage look, others decorate their images with artistic flourishes in Photoshop, and then there's my husbands. His style emerged immediately. My guy knows what he likes and does it well. I like to describe it as classic dramatic because his images are clean with a high contrast in color, light and dark. He doesn't go too trendy which is great if you want your pictures to have a timeless look to them. He also loves to be creative and fun, especially with family portraits.
    I love how this image shows the personality of each of us. I will admit, I'm probably too relaxed in my parenting. My son is crazy and lives dangerously. Our little princess is 100% girl and can easily spend the entire day in her dress up attire. Our little dog just tags along and is a constant companion for all of us.
   I think it's great when you can capture the silliness of kids to always remember the fun of being little.

Thursday, April 26, 2012

Starting Over - Again

     The last month has been CRAZY.  I made a big job change and switched to a new salon. It has been stressful trying to notify my clients, order product, try new products, make sure I have all my supplies on hand, buy supplies I'm lacking, (so far there has been more cash out than in), get a business license, and adjust to being an independent contractor. Right in the middle of all this I also got into a hit-and-run car accident. Madness! But at some point, you just shrug your shoulders and press on. I'm hoping this change will simplify my life in the long run. Since I will no longer be an employee, I can go home early on a slow day and pointless meetings will be a thing of the past.
     I may be stressed out and tired, but this brings us one step closer to achieving our long term goals of owning our own little salon/photography studio. Hooray for that!


Saturday, April 7, 2012

Feather Headband Tutorial

It's been a long time since I've done anything crafty so I made a point to make SOMETHING for my daughters Easter outfit. Joann's finally has this really fun netting and I bought a couple yards just to have on hand a few months ago. Everything else was already in my craft stash so I  used whatever looked appealing to me and hot glued it all together. I hope you like it!


I hope you all have a blessed Easter!

Wednesday, February 1, 2012

An Afternoon At The Park

We took the kiddos to the "park" the other day. Actually, it was just an empty field and gravel path near our house. Our kids didn't care, as long as we played together as a family. This was also the golden hour for picture taking so I dressed the kids up as well. Kill two birds with one stone. My hubby wanted to play with the dramatic lighting of the setting sun and so he used an off camera flash placed to the side of our adorable subjects to be sure they wouldn't be lost in the growing shadows. Here are the best shots of the day:

Friday, January 20, 2012

Inexpesive Pirate / Neverland Party

My original thought was to have a pirate party for my little guy; however, I ended up officially calling it a Neverland party. I love to encourage guests to dress up and I thought mermaids, pirates, fairies, lost boys, etc. would be fun costume ideas. The birthday boy himself wore a costume which loosely resembles that of Jake and the Neverland Pirates. I made the vest out of felt (which I bought for around $2) and I used the trim and buttons I found in my sewing supplies. His shirt was a 25 cent yard sale find, and everything else we already had on hand.

The hanging pirate decorations I bought at a yard sale for a quarter as well. It was a brand new three pack and they were so long, I cut them up into shorter pieces.
The banner was made from paper we had in the kids craft stash and all the other table decor was from around the house.
The plates, napkins and cups I found on clearance for 75 cents each at  Target last summer.
I made the cake myself and the favors were just treat bags with Pirate Booty and extra gold coins.
Everything turned out pretty cute and wasn't too elaborate or complicated. It was perfect for my little pirate!


Thursday, January 19, 2012

Keeping Kids Still

My brother and his wife just loaned us this cool little bench for taking pictures. I couldn't wait to try it out as a prop. So I  dressed up the kids and prepped snacks to keep them in place. The last time I tried to take pictures of my little guy by myself was a joke. Not one picture turned out right. So you might see him with his mouth full, but at least he's where I want him to be!


Saturday, December 10, 2011

Salt Dough Ornaments


I'm still learning how to manage my time at home. This new hair styling job takes up way more time than I'd like and my housework will often fall to the way side. Sometimes I simply choose to play with my kids over keeping a clean kitchen. Here's one of those days!
I found this super easy recipe for salt dough and as soon as I realized we had all the ingredients, it instantly rose to the top of my to-do list.


The recipe I used was:

1 cup salt
2 cups flour
1 cup water


I kneaded it for about 7 min. then we rolled it out, used cookie cutters, and I poked a hole in the top with a straw. Easy peasy.


We had to bake them for around 2 hours at 250. When they cooled we used acrylic paint, white glue and glitter to decorate. I did all the writing with a black Sharpie. It worked like a charm and was much easier than a brush.


After they were completely dry, I sprayed them with a high gloss spray. I love a little shine on kid projects. They somehow look a little more finished.


 The kids had a blast! (And I obviously enjoyed our project as well!)