Pages

Saturday, July 30, 2011

Sunday Best

I love to dress up my little doll. Lucky for me, she's quite willing to let me put her in sweet little dresses and be ultra girly. Every Sunday, I dress myself and the kids up the best I can from top to bottom. We look like a million bucks but I never shell out as much dough as it looks like. Here's a perfect example. This is among my favorite looks for Little Miss:


Dress $6 
from consignment store

Headband Free 
I made it 

Pearls $1
Target

Shoes $12
T.J.  Maxx


I will sometimes spend a few extra dollars for shoes or a hat if I think it will top off their wardrobe. I know this sounds silly, but I think accessories can really make an outfit, even for kids!

Friday, July 29, 2011

Frayed Rosette Headband Tutorial

Here's my Frayed Rosette Headband Tutorial in case 
you missed it on Ucreate:

Make sure all your strips are cut on the bias (cut your fabric on an angle so the threads in the fabric are running on the diagonal). This way you don't have threads shedding off your headband.


Cut one strip of fabric 2" X 9"
Cut two strips of fabric 1-1/2"  X 9"
Cut two more strips as long as you can make them 1" wide to wrap your headband with.


Step One: Take the widest strip and fold in half lengthwise about 3/4 of the way as in the picture.


Step Two: Sew along the long folded edge and pull the stitching to gather it.


Step Three: Sew the short ends together so you have a ring.


Step Four: Squash the circle a little to make an oval and sew the middle together on the backside so it stays an oval shape.


Step Five: Repeat steps 1-4 on the 1-1/2 " strips.

Now you should have three ovals that look like this.

Step Six: Fray the edges of the ovals by pulling on the fabric with your fingers.


Step Seven: Fray one side of your long 1" strips. Then simply wrap your headband in the strips of fabric pulling the fabric a little so it forms to the arch of the band. Wrap the fabric at a slight angle and overlap just a little as you go. I put a dab of hot glue on the underside of the headband with each wrap of fabric.  If you need two strips to completely cover the headband, place your "seam" on the top where you'll be gluing your rosettes.


Step Eight: Hot glue the ovals onto your headband and if you'd like add a button, rhinestones, or a vintage earring like I did.

Day At The Park


We went to the park the other day so I could practice my photography skills. 
I think it turned out pretty cute so I thought I'd share it with you!

Monday, July 25, 2011

Hooked On Phonics Deal of the Week


    We are huge Hooked on Phonics fans around here. I actually gave my daughter the choice of which workbooks she wanted for preschool and she picked Hooked On Phonics. I think she likes how colorful it is and the progress chart with stickers is fun for her.


     Anyway, since we are all about deals, I wanted to make sure you knew about the Hooked On Phonics deal for this week. I even have a link on my sidebar!

Hooked on Spelling - ages 5 to 8: 
Normally $39.95, on sale for $24.95, 
with coupon code HOP20, only $19.96!

Child Haircut Tutorial

     Cutting kid's hair is sooooooo tricky. First of all, they wiggle. Second, their hair is weird. Seriously, it is very different from adults. Especially blondes. You can see chop marks very easily. It is a complete waste of time to try to do a slick Sassoon blunt cut on a child. I've seen someone do a precision cut on a child once and while they were sitting it looked flawless. As soon as that little girl stood up, the whole cut went wonky and choppy. It was very strange. So I've developed my own strategy to deal with the fine, mysterious hair of children and I'm really excited to show you how!
     My model is one of the most well behaved three year old's I know. Yet even still, she wiggled and wanted to play with her cousins instead of get a haircut.


Start by sectioning the hair into quarters. Part from behind ear to ear and front to back down the middle.


Now take a horizontal slice along the bottom on one side. This will be your first section. Hold the hair as close to the child's body as possible. (Wiggly kid  = crooked lines. Just do the best you can)
 Now here's the secret...


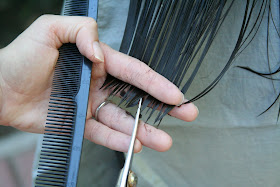
     Don't cut straight across. Using the tips of your scissors, nip into the hair creating a notched line along the bottom at your desired length. Keep your notches narrow. This is called "point cutting". You will create a soft, diffused edge that won't look choppy. Just don't cut your fingers!

     Once this first section is cut, consider it your guide. Your guide will show you how long to cut the rest of the hair on this area of the head. Proceed to let down 1/2" to 1" horizontal sections of hair depending on the thickness of the hair. You want to still be able to see your guide through the next portion of hair so you have a reference for length and all the hair will be evenly cut. Continue to hold the hair close to the body as you cut.


Cut the entire backside of the head this way.


     My model didn't have much hair on the sides of her head, so I let it down all at once and used the back as a length guide to cut across. If the child your working on has thick hair, let down small horizontal sections like the back and just point cut the entire side the same way.
Now for some simple layers...


Take a narrow rectangular section on the very top of the head. This will be your guide for all the layers.


Lift it up straight in the air and point cut across to the desired length.


Using that center section as a guide, take  1" sections of hair perpendicular to the center part, lift straight up into the air and point cut across the top. Do this to hair on either side of your guide and any other hair on the back/top of the head.

You're pretty much done. You can point cut the bangs as well if you'd like.


I hope this helps you out! Just remember, point cutting is the secret!

Saturday, July 23, 2011

Flower Ballerina Headband


In case you missed this on Me Sew Crazy, here's my latest headband tutorial:

When I was a little girl my mom would take me to see The Nutcracker ballet. My favorite costumes were those worn during The Waltz Of The Flowers. Those beautiful flower tutus were the inspiration for this headband.


Start by taking apart your flowers and throwing away the hard plastic pieces. Then apply a thin line of glue around the edges and dipping them into the glitter.


Once the glitter is dry, put your flowers back together again and hot glue some gems in the center.


Hot glue your trim along the top of you headband.


Sew down the middle of each tulle strip lengthwise. Pull to gather and wrap the thread around the middle several times before knotting.


Hot glue your two "tutus" a little off to the side of the headband.


Hot glue your flowers and leaves on top of the tulle.
Your headband is now ready for a sweet little ballerina!


Thursday, July 21, 2011

Secrets for Buying Eyeshadow

     Really nice makeup can be a small fortune. And I'm addicted to nice makeup! The color always goes on smoother, lasts longer, has higher pigment and blends better. So here's a little cheat when it comes to buying eyeshadow. Buy a quality eyeshadow palette with MANY colors. I have two Pop eyeshadow compacts I bought years ago. I still love and use them all the time.
     Right now, Ulta has a value palette from Pop  called "Bare Textures" and it contains 39 colors with eyelid primer for only $28!!!
    That's less than 72 cents for each color. Pretty sweet deal! Junky makeup can cost more than that! I think this is one of the better deals I've seen in a long time. Since Ulta always has a large variety of value kits to choose from I put them on my sidebar so you can see the other options as well.
     Just remember, you can afford quality makeup if you are strategic in your purchases!


Wednesday, July 20, 2011

EASY Barbie Dress Tutorial

A few weeks ago, my daughter asked me to make Barbie clothes and I immediately said, "NO WAY!" All those tiny seams and closures....forget it!
Then my three year old had the genius suggestion of "just don't put on any straps". That got me thinking...tube dress...knit jersey....we have some reject shirts in the garage....I think I could put something together! And so I came up with this -

To start, you'll need an old T-shirt you don't want any more, or some jersey knit you've purchased. Then cut it up into the following pieces:

Bodice  4"X5"
Skirt 3 1/4" X 15"

You'll also need 1/4" elastic cut into 2 pieces.
One should be 4" and the other 3"

Step One:
Sew the 4" elastic along the long side of your bodice piece. Fold over the fabric edge onto the elastic and zigzag it stretching it just a tad as you sew.

Step Two:
Now take your 3" piece of elastic and sew it down the middle of your bodice piece. This time you will REALLY need to stretch the elastic as you sew so it is stitched all the way across your fabric. Zigzag once again.

 Step Three:
Take your long skirt piece and stitch across the long edge to gather.

Step Four:
Pull the gathers to fit along the bottom of your bodice. Sew the skirt onto the bodice trying to stitch directly on top of your gathering stitches. I zigzagged this as well.

Your dress so look something like this now:

Step Five:
Fold it in half with the right sides together and straight stitch a narrow seam down the back.

Step Six:
Flip it right side out and embellish with bows or whatever else your heart desires!

Maybe making Barbie clothes isn't so tricky after all!

Tuesday, July 19, 2011

And The Winner Is...

Thanks to everyone who participated in my first giveaway!
I appreciated all the comments. It's always nice to know
this blog as fun for you as it is for me.
And now, without further ado....
the winner is...

Brooke S. Rochon!

Congrats! I'll be sending you a message and the 
hair clip will be on it's way!

Saturday, July 16, 2011

Lily Bloom

Yesterday I discovered the lovely little handbag brand, Lily Bloom. I was at T.J. Maxx looking for boots for my daughter and of course their purses at the front of the store caught my eye. I instantly fell in love with these bags!


They are so cheerful and the price was amazing.  They are also made from recycled plastic which is always cool.  Most bags were only around $16 - $20. At least at T.J. Maxx they were. I'm pretty sure the original prices were closer to $55. Sadly enough, I walked away empty handed. They had enough in stock for me to contemplate the purchase for a while. We'll see. I have plenty of bags already. Maybe if I budget extra carefully this next week I'll have a little money to play with and treat myself to something fun. :)

Wednesday, July 13, 2011

My Tutorial On ME SEW CRAZY!!


     I'm so very honored to have a tutorial featured on Me Sew Crazy today. Jessica seems to be a woman after my own heart! She loves spending time with her family, loves to sew, and is a Sister in Christ.

So please head on over to see what I've been up to!
Ballerina Headband Tutorial